Have you ever thought about creating a sales funnel? Do you think it’s difficult and overwhelming? Don’t know where to begin? As a business person, you realize marketing’s importance: without sales, your business would fail. Therefore, if you haven’t already put time and energy into this task, now’s the time to start; and one easy way to start is the utilization of ChatPion as a sales funnel.
What is the sales funnel?
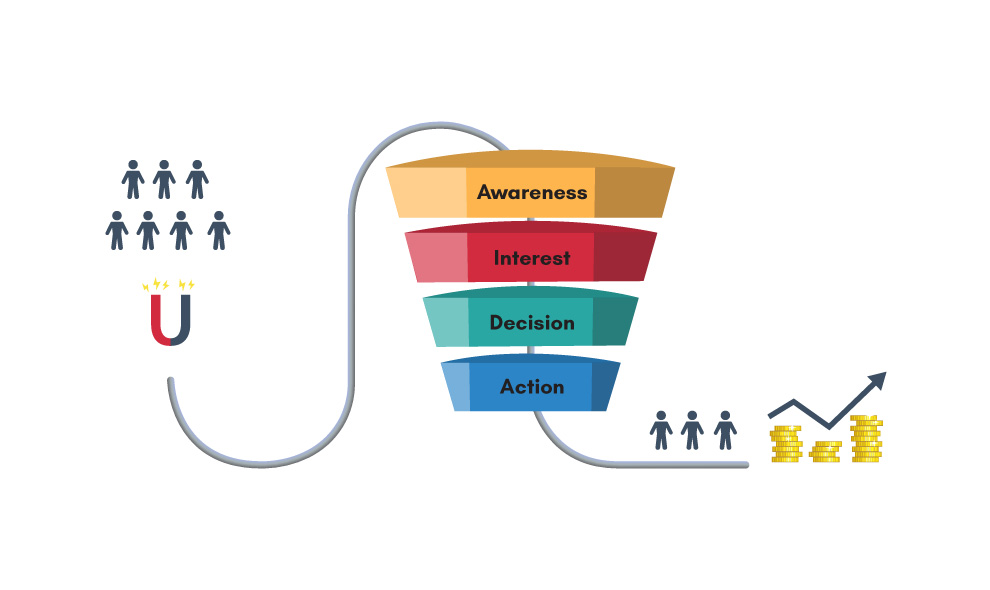
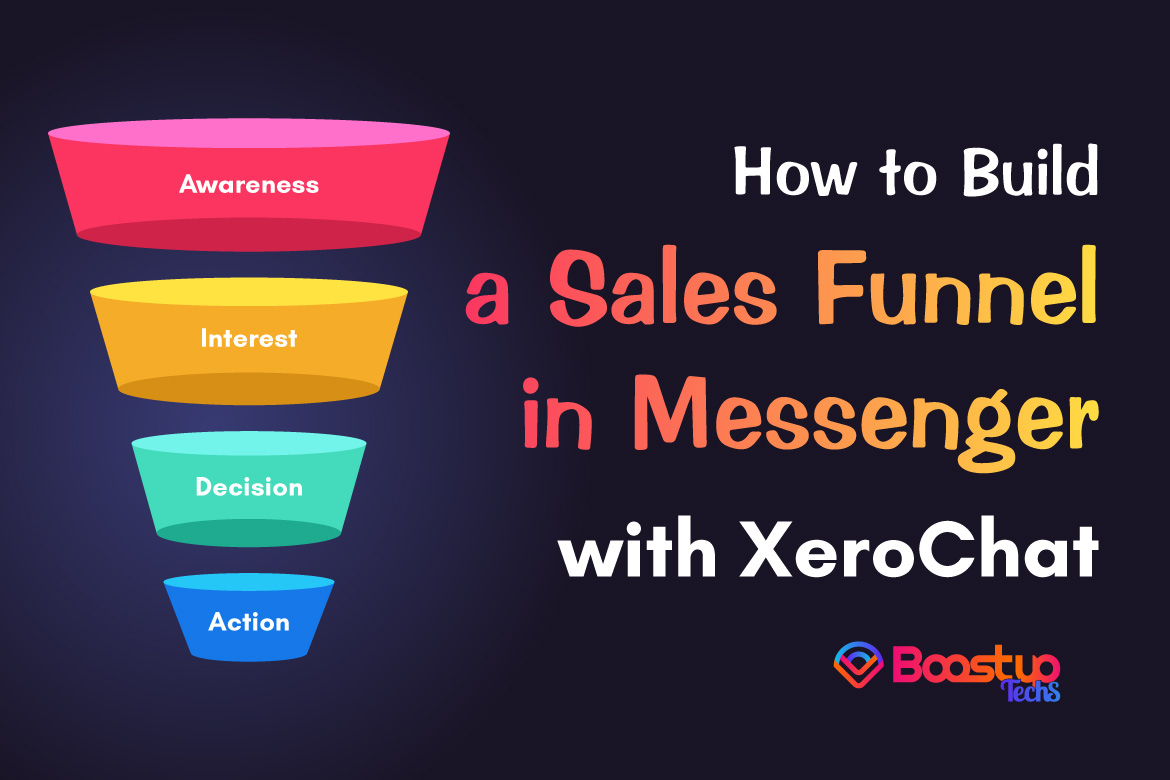
A sales funnel is the advertising and marketing term for the voyage potential client goes through on the way to buy. There are different steps to a sales funnel, commonly known as the top, middle, and bottom of the funnel, even though these steps may vary depending on a business’s sales model. A typical sales funnel has 4 stages:
- Awareness
- Attention
- Determination
- Action
The four steps in a sales funnel are stages of customers’ mindset. Sales funnels start from marketing, where we create awareness. When we get their contact details, we try to reach individuals to create interest in the product and finally sending them to the sales page to make a purchase.
Creating a Sales Funnel using ChatPion:
Collect Leads/Email:
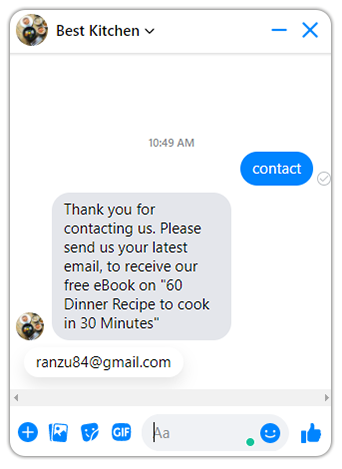
In the first step of the sales funnel, we need to create awareness and then collect their email or phone number to get them into the sales funnel. When a customer comes to our Facebook Messenger, we can collect their email or phone number. We can generally ask them for their contact details or we can create a lead magnet to collect their contact details. A lead magnet is something, that can attract customers to give their email or phone number. You can offer a free eBook or anything related to your product as a gift to gather their email or phone. In this case, the eBook is the lead magnet. When we collect their contact details, prospects become leads.
By using ChatPion you can variously collect leads, we can use Quick Reply, Web View, and User Input Flow & custom field (A ChatPion Add-on).
Add Email and SMS API’s to send Email and SMS:
To create a sales funnel, we need to add the Email/SMS sender API, Let’s see how to add an Email sender API or SMTP server.
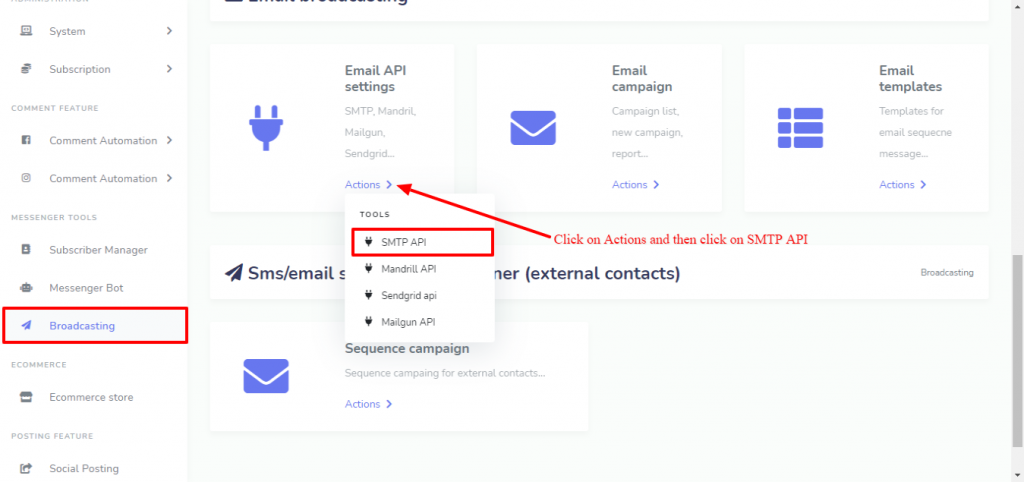
To add an Email sender API or SMTP go to Broadcasting>Email API settings >Actions
I have added an SMTP here, you can add Email send Api’s like, Madrill, Sendgrid, and Mailgun too. Please follow the screenshots for the step-by-step process to add an SMTP or email sender API.
Then click on New SMTP API
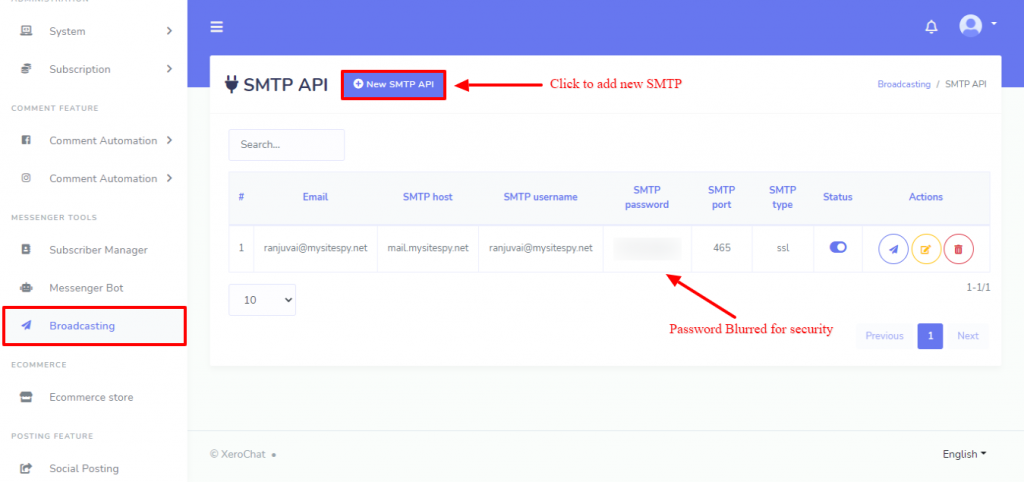
Save smtp
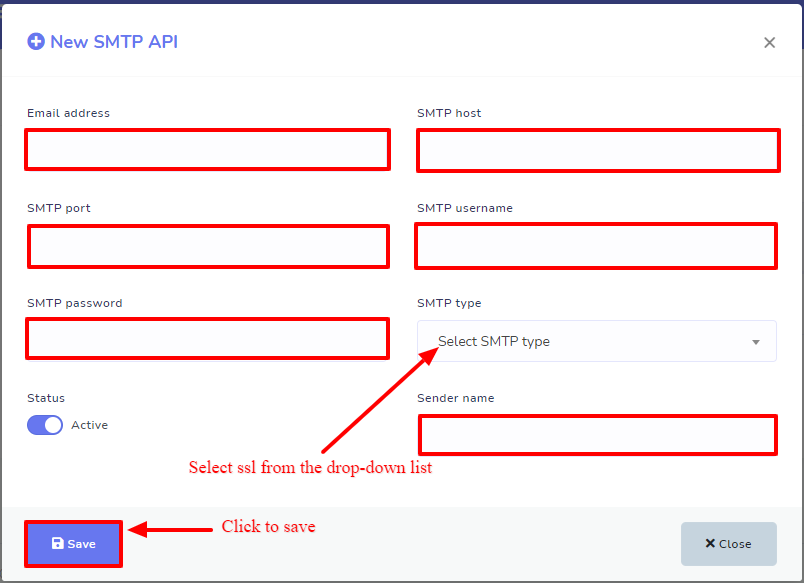
ChatPion needs the Email or SMS sender API to send email and SMS. Now set the default API for the Email and SMS sequence campaign.
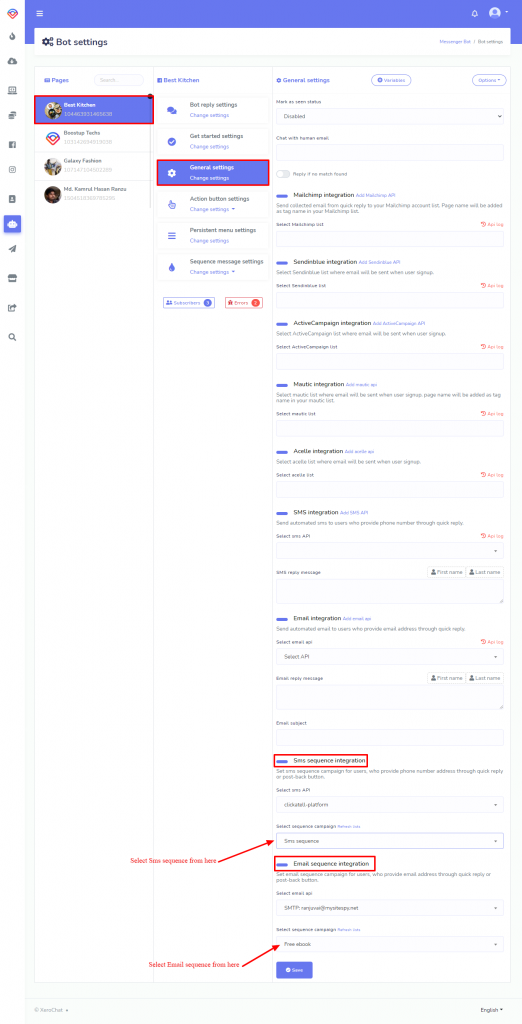
To do that go to Messenger Bot > Bot Settings, select your Facebook page and then go to General Settings
On the right side under “Sms sequence integration” and “Email sequence integration” choose the APIs you want to use for the Sequence campaign.
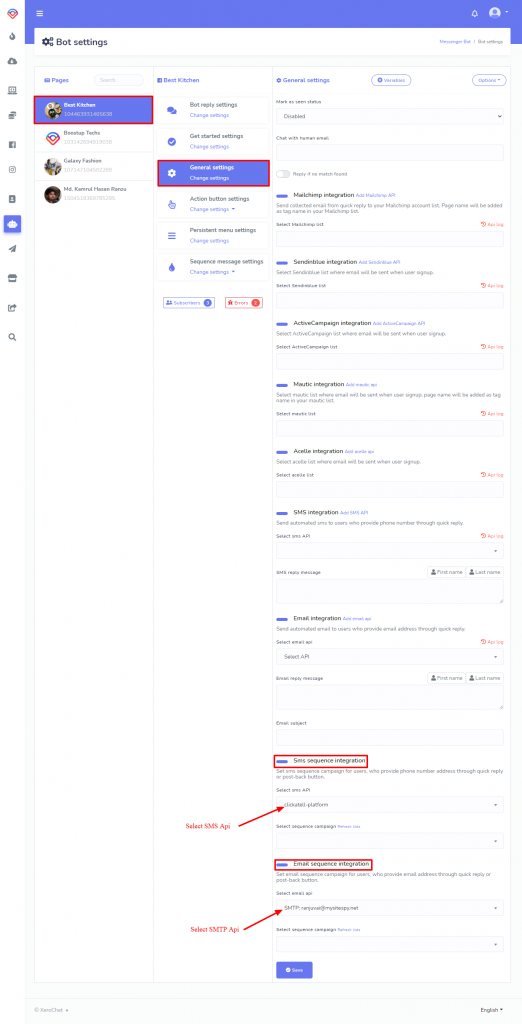
Assign leads to Email, SMS, Messenger Sequence:
A sales funnel on ChatPion could be created by using “User Input Flow & Custom Field” and “Sms/Email Sequence campaigner” Both of them are ChatPion addon. First, create an Email or Sms sequence and then assign the Sequence to leads (Email or phone number). Please follow the steps shown below to create a successful sales funnel.
Step-1 (Creating Email/SMS Sequence):
Go to Messenger Bot > Bot Settings
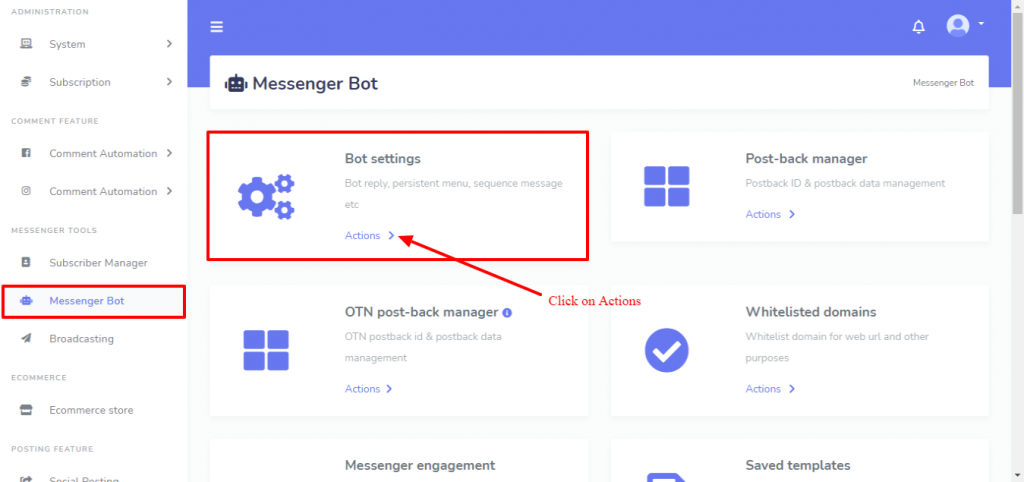
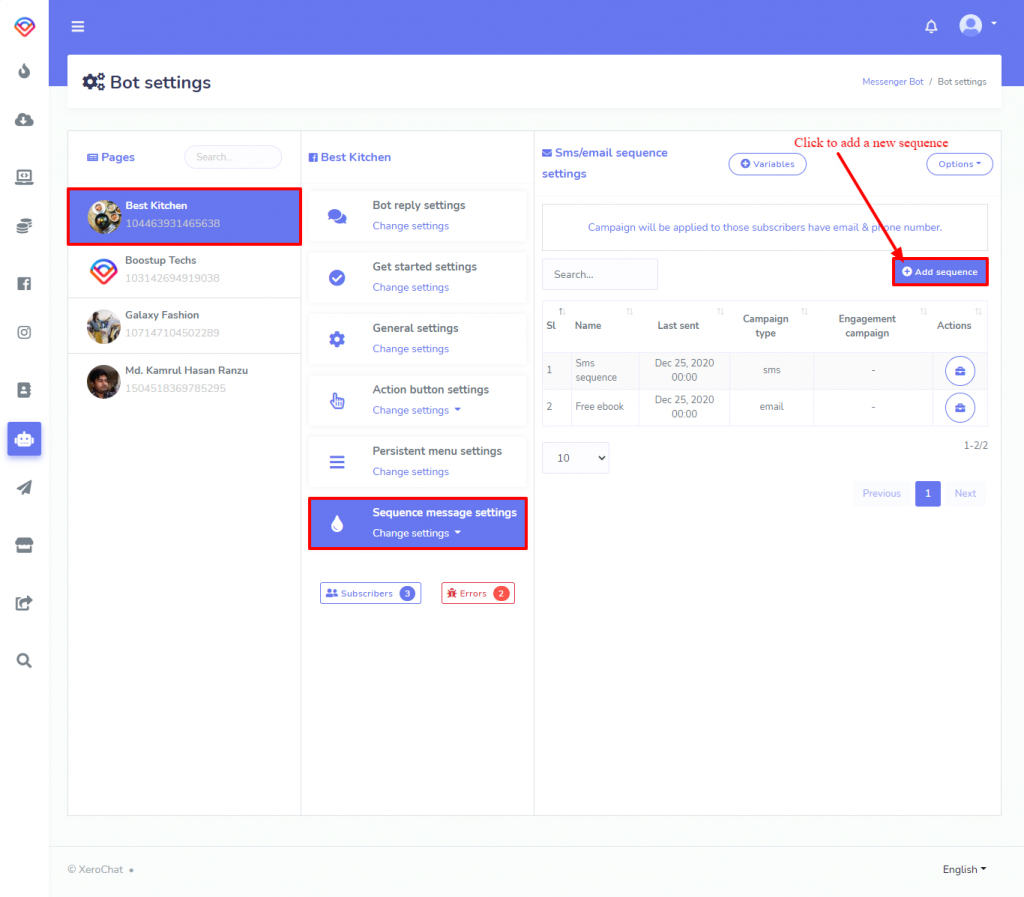
Click on the Actions button under the Bot setting, the Bot Settings interface will appear. Select your Facebook Page and then go to Sequence Message Settings and click on Change settings, a drop-down menu will appear with Messenger sequence settings and Sms/email sequence settings. Click on Sms/email sequence settings to create an Sms/email sequence.
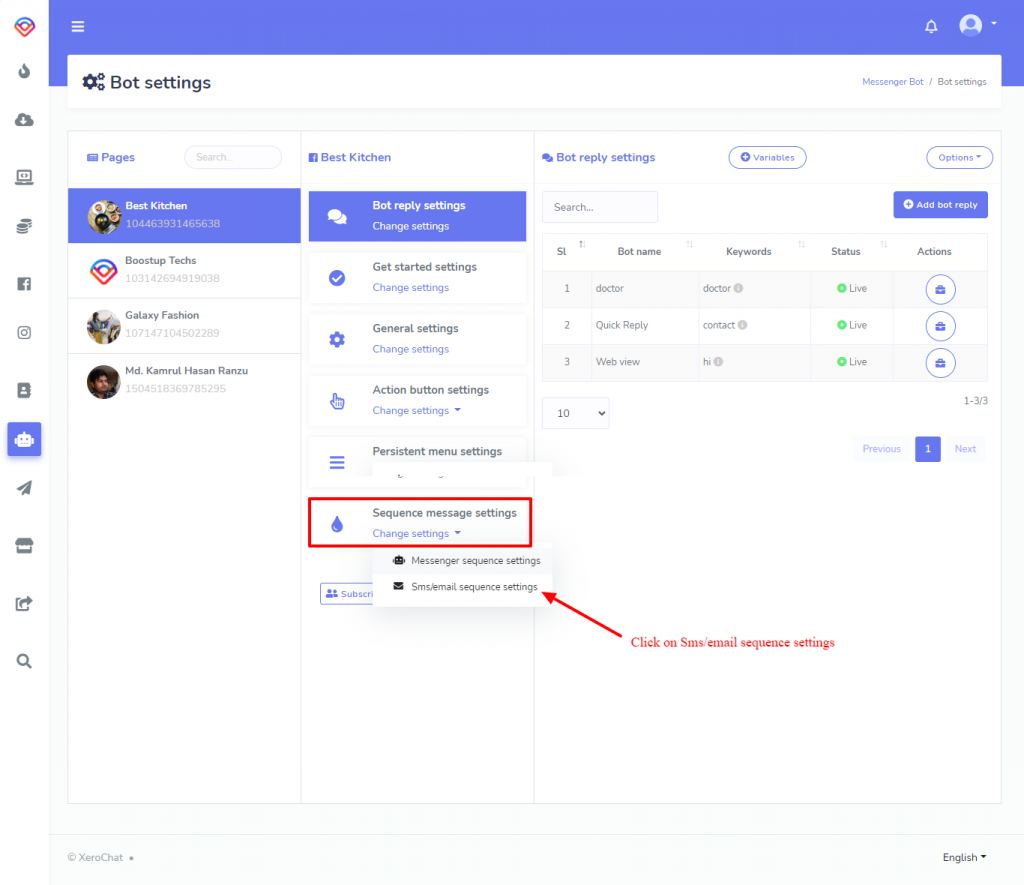
In the same window, on the right side, the Sms/email sequence interface will appear. Click on the Add sequence button.
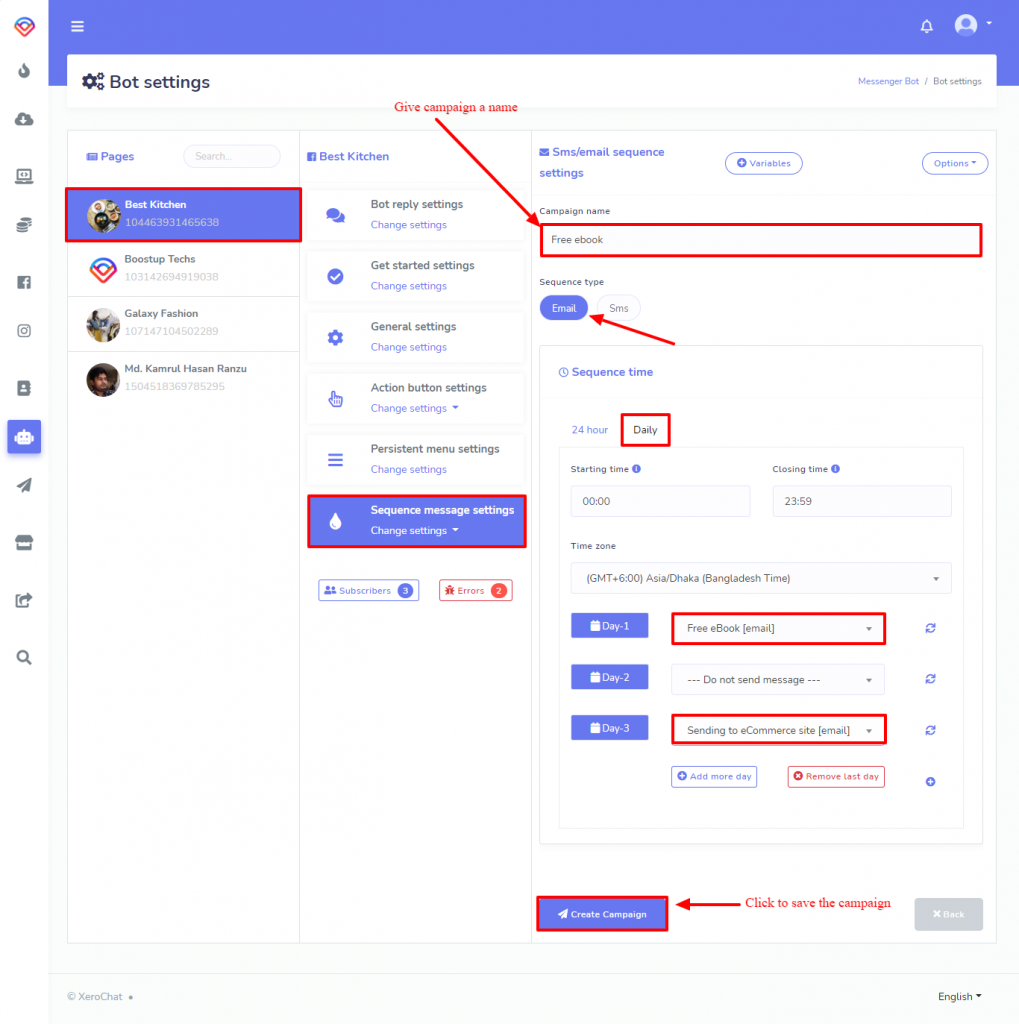
Give a name for the Campaign, then select the type of Sequence from Email / SMS, then Sequence time, we can create two types of sequence, one is 24 hours and the other one is Daily. Here I have selected Daily because i will create a Sequence campaign that will last for few days, you can also create a campaign for 24 hours, sending different emails or SMS on the same day within the 24 Hours.
You can also change the starting and closing time. Select your time zone. Then select the email template from the dropdown list for days you want to send an email. You can add a new template and add more days to the campaign.
On the first day of the email sequence, I will send an email with the eBook I promised to giveaway for free. So, I will create my first email sequence with a greeting for being on my subscriber’s list and send them the free eBook on “60 Dinner Recipe to cook in 30 minutes”
Click on the Add new template to create an email template, and then set it for the email sequence.
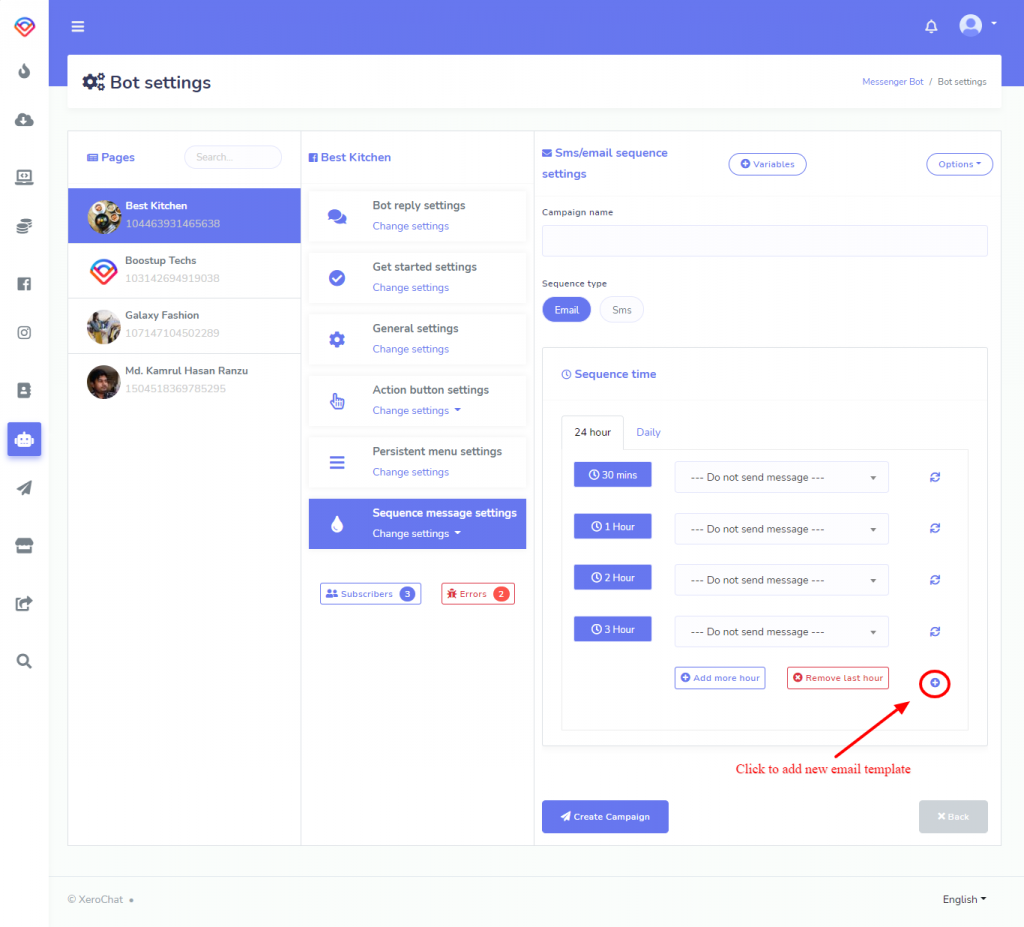
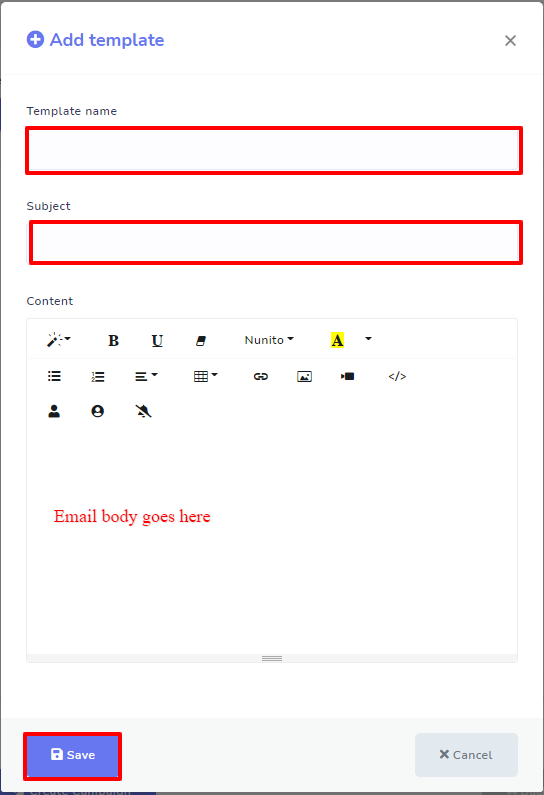
On Day-1 of the sequence, I will add the first email template (Email with the free eBook). For Day-2 I will not send any email, and on Day-3 I will set my second email (sending to the sales page), finally save the campaign. You can add more days to send more emails to the sequence if you want to.
You can create different Sms/email sequences for a different group of leads, and assign them accordingly.
You can also create a Messenger sequence, but Facebook Messenger allows you to send a promotional message only within 24 Hours of the subscription.
Step-2 (Assign the Sequence while creating User Input Flow):
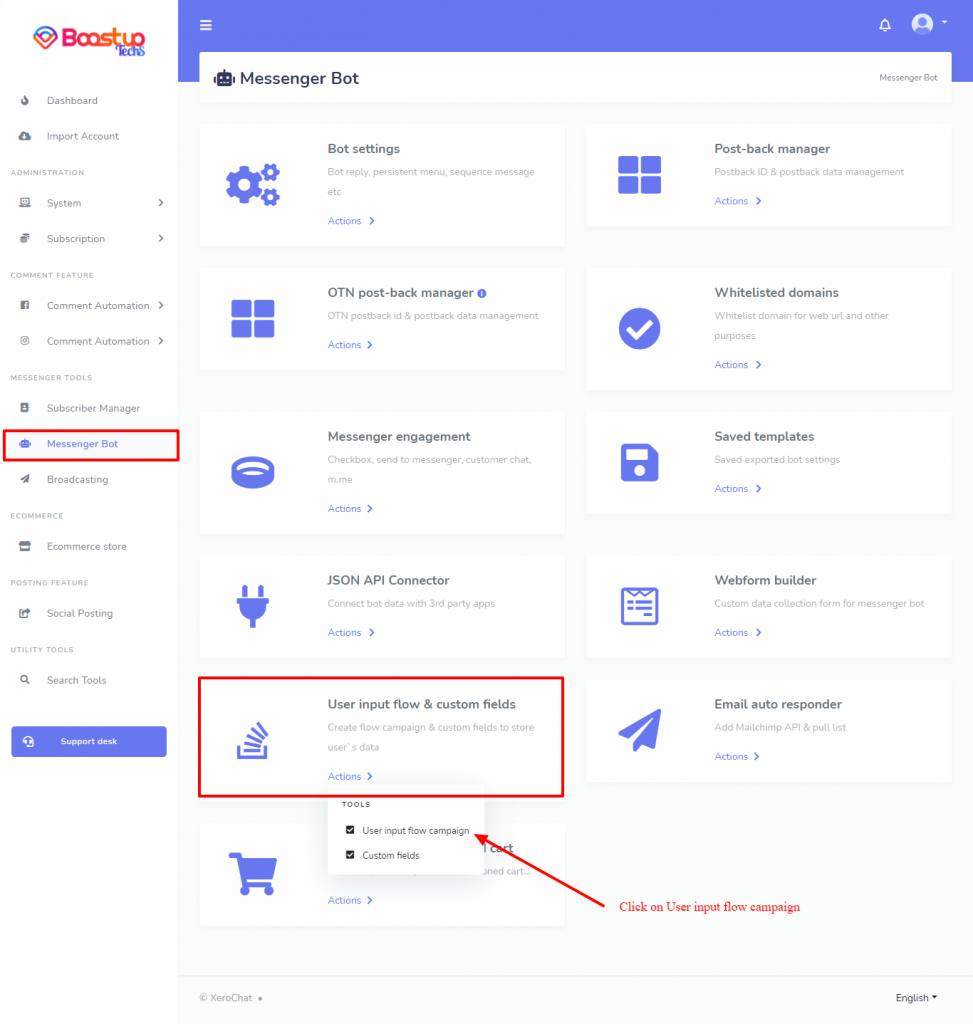
To create a User Input Flow, go to Messenger Bot > User Input Flow & Custom Field and click on Actions then Click on User input flow campaign
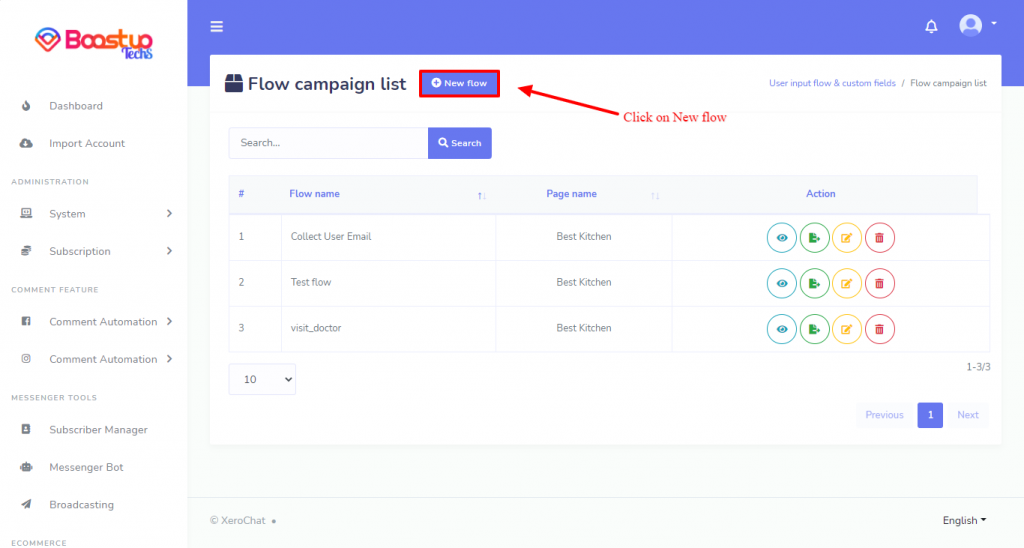
When you click on User input flow campaign, the Flow Campaign list interface will appear. At the top left corner, you can see a button named New Flow, click on this button, an interface to create a new user input flow will appear.
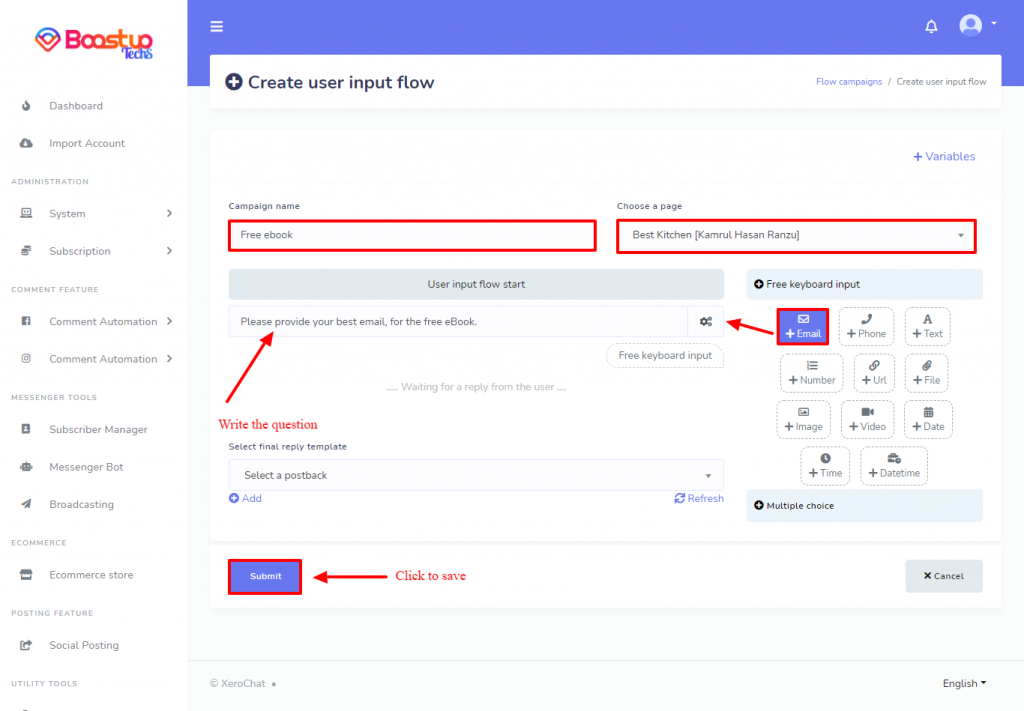
Give the campaign a name and choose the Facebook page for which you want to create the User Input Flow. From the right side choose a question type. Here I have selected email, to collect the user’s email. Write the message to ask for the email.
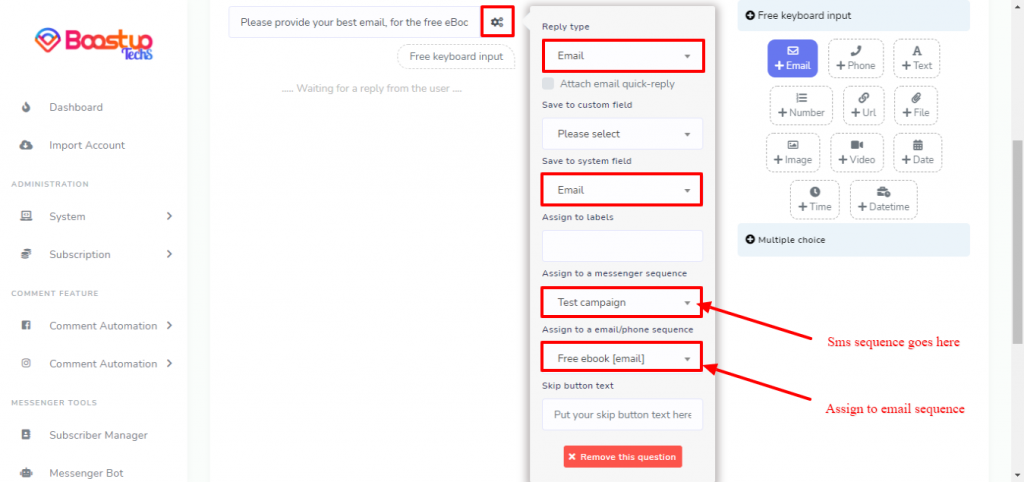
With every question there is a settings button, click on that settings button, and assign the Sms/email sequence and Messenger sequence for the lead.
Now, Let’s save the User Input Flow, and after that add this “user input flow” to the messenger bot.
Sales funnel without “User Input Flow and Custom Field (A ChatPion Add-on)”:
You can also create a sales funnel without “User Input Flow & Custom Field”. There are two ways other than “User Input Flow & Custom Field” to collect the user’s email and phone number. You can use “Quick Reply” and “Web View” to collect leads and then assign Sms/email sequence to those leads. But this is limited to only one particular Sms/Email sequence at a time. But with the use of “User Input Flow & Custom Field” we can create different types of Sms/Email sequence for a different group of leads.
To create an Sms/Email sequence for leads collected by “Quick Reply” and “Web View” go to Messenger Bot > Bot Settings > General Settings and select the Sms Sequence campaign and Email Sequence campaign on the perspective field as shown below.
Abandoned cart recovery:
You can also optimize your sales funnel using Abandoned Cart Recovery. If you use ChatPion to create an eCommerce store on messenger and customers leave the eCommerce store after adding products to the cart. “Abandoned cart Recovery” could be used to send a notification to the buyer with a message.
Read the blog on how to use the Abandon Cart Recovery, to know how to set up the abandoned cart recovery.
1 comment
[…] can also use the XeroChat as a sales funnel for your business, XeroChat is not only a Chatbot, it can sell product through e-commerce, can […]